
Last month, I was trying to take a photo at my cousin’s wedding, nothing fancy, just a quick shot of the cake, and my phone froze up with that alarming message: “Can’t take a photo. Not enough storage.” I wanted to throw the thing across the room.
I’ve had my Samsung Galaxy A55 for about a year and a half. It has 128 GB of storage. How on earth was it full?
That evening, I sat down and figured it out. Went from 1.8 GB free to just over 19 GB free by the next morning. No factory reset, no new memory card, no paid apps. Just a systematic cleanup of all the digital junk I’d been hoarding without realizing it.
If your phone is giving you the same headache, this is exactly what I did step by step, with the embarrassing details included.
Step 1: Find Out What’s Actually Eating Your Space
Most people skip this and just start deleting apps. That’s why they free up 200 MB and wonder why nothing changed.
First, go to Settings, then Storage. Your phone will show a breakdown of photos, apps, downloads, cached data, and system files. Study it for a minute. This tells you where to focus your energy.
On my phone, photos and videos were at 36 GB. My Downloads folder was sitting at 11 GB. The cache was around 6 GB. Apps were only about 9 GB, which meant uninstalling apps wasn’t going to save me much. Had I not checked this first, I’d have spent 30 minutes uninstalling games and freed up maybe 500 MB.
Know your enemy before you fight it.
Step 2: Deal With WhatsApp First (Seriously, Do This First)
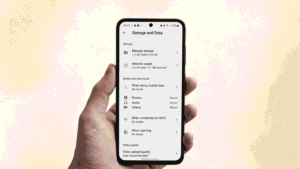
This surprised me the most. WhatsApp was quietly holding 7.3 GB of media on my phone. That’s gigabytes of wedding videos I didn’t ask for, Good Morning GIFs from group chats, voice notes I never listened to, and forwarded “viral” videos I’d already forgotten existed.
Here’s how to clean it out properly.
Open WhatsApp. Go to Settings, then Storage and Data, then Manage Storage. You’ll see your chats listed from biggest to smallest. Open the ones at the top; those are your worst offenders.
Inside each chat, you’ll see everything shared there. Long-press any item to select it, then tap the others you want to remove, and delete them. You can also filter by large files or by type to go faster.
On the same Storage and Data page, turn off auto-download for videos. Change it to “Never” for both mobile data and Wi-Fi. Photos on Wi-Fi are fine to keep if you want, but video auto-downloads are the main culprit. From now on, you choose what gets saved; the phone doesn’t decide for you.
I cleared 5.8 GB from WhatsApp in about 15 minutes. That alone was already a massive improvement.
Step 3: Use Google Photos the Right Way
Here’s where I made a mistake that I don’t want you to repeat.
About six months ago, I deleted a big batch of photos from my phone to free up space. I assumed Google Photos had backed everything up. It had, except for one folder I’d accidentally excluded from backup. Those photos are gone now. I’m still annoyed about it.
So before you delete a single photo, do this: Open Google Photos, tap your profile picture in the top right, and go to Photos settings, then Backup. Look for a line that says “Backup is on” and shows that everything is synced. If it says “Waiting for Wi-Fi” or shows some items still pending, wait. Actually, wait until it finishes before you do anything else.
Once you’re sure the backup is complete, here’s the move most people don’t know about: tap your profile picture again, then tap Manage storage, then Free up space. This button deletes photos and videos from your phone that are already safely backed up to Google’s servers. Nothing is lost; it’s all still in Google Photos, accessible from any device. But the local copies that were eating your phone’s storage are gone.
This single button freed up 13 GB for me. That’s not a typo: thirteen gigabytes, one tap.
Also, go through your screenshots separately. They rarely back up automatically, and most of them are completely useless: delivery confirmations, memes you were going to send someone, UPI (payment receipts) from 2023. Go through the Screenshots album manually and delete aggressively. I had over 700 screenshots and kept maybe 35.
Step 4: Clear App Cache the Smart Way
You’ve probably heard “clear your cache” so many times it sounds like a joke at this point. But it actually works if you target the right apps instead of trying to clear everything at once.
The apps that build the biggest cache on most Android phones are Chrome, Instagram, Spotify, YouTube, Google Maps, and Netflix. These are the ones worth doing manually.
To clear the cache for any app, go to Settings> Apps> the app you want> Storage> Clear Cache. Do not tap Clear Data; that’s different. Clear Data wipes your login, settings, and local progress. Clear Cache only removes temporary files. The app keeps working the same, just without the bloat.
On Android 14 and 15, there’s no “clear all cache” button. Google removed it a while back. So you go app by app, or you use Files by Google (it comes pre-installed on most phones, and it’s the one tool I actually recommend). Open it, tap the Clean tab at the bottom, and it’ll find junk files automatically. It’s not perfect, but it’s fast.
Clearing the cache got me about 4.5 GB back across all apps. Not the biggest win, but combined with everything else, it adds up.
Step 5: Open Your Downloads Folder and Brace Yourself
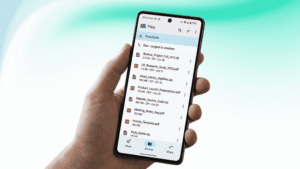
Tap the Files by Google app, then Browse, then Downloads.
I’ll be honest, I hadn’t opened this folder in months. What I found: 14 PDF documents from my bank that I downloaded and read once. Six APK files from apps I may or may not have installed. Three ZIP files from work projects that wrapped up ages ago. A couple of large files I genuinely could not identify.
Sort everything by size. Delete the biggest items first. Ask yourself honestly: have I touched this in the last 60 days? If the answer is no, it goes.
I cleared 9.1 GB from this one folder alone. Nine gigabytes. Sitting there doing nothing for months.
Step 6: Check Your Streaming Apps
This one catches people off guard. Streaming apps store downloaded content silently in the background, and the files are surprisingly large.
Open Netflix. Go to Downloads. Delete anything you’ve already watched or anything you downloaded with good intentions and never got around to.
Open Spotify. Go to Settings, then Storage. You’ll see how much space the cache and offline music are taking. If you downloaded playlists to listen offline and haven’t touched them in weeks, clear them.
Do the same for YouTube Premium, Amazon Prime Video, and any podcast app you use. Pocket Casts and similar apps store every episode you’ve downloaded, including ones you’ve already listened to.
Between Netflix, Spotify, and a podcast app I use, I found 5.4 GB of content I’d already consumed. Gone in a few minutes.
Step 7: Audit Your Apps Honestly
Go to Settings, then Apps, then tap the sort option, and sort by storage size. Scroll through the list.
You’ll find apps you installed once and forgot about. You’ll find apps that are smaller than you thought and apps that somehow ballooned to massive sizes. Look at the total storage for each app that includes the app itself plus its data, which is sometimes much larger than the app.
I found a food delivery app I hadn’t ordered from in over a year. A fitness app I used twice. A game I installed for a long trip, but never actually played because the train had Wi-Fi. None of them was huge on its own, but together they accounted for about 3 GB.
Uninstall what you don’t use. For the apps you do use but don’t use often, like banking apps or one-time-use tools, consider uninstalling them and reinstalling from the Play Store when you need them. Takes 30 seconds and saves the background storage.
Step 8: Use Android 15’s Duplicate Photo Finder
If your phone is running Android 14 or 15, Google Photos now has a built-in duplicate finder. Go to Google Photos, tap Library at the bottom, then Utilities, then Manage storage. Look for “Review duplicates.”
It groups photos that are identical or nearly identical burst shots, photos sent to you on WhatsApp that also saved to your camera roll, screenshots you took twice by accident. It shows you the best quality version and lets you delete the rest.
I had over 300 duplicate or near-duplicate photos I didn’t even know about. Cleared another 2 GB from this alone.
If you’re on an older Android version, the built-in tools won’t have this, but Files by Google has a similar feature under the Clean tab.
Common Mistakes to Avoid
Deleting photos before confirming backup: This is the biggest one. Always make sure Google Photos shows a complete, finished backup before removing anything locally.
Using random cleaner apps from the Play Store: Most of them are not worth your time. Many ask for permissions they don’t need, show you exaggerated “threat” counts to look impressive, and some are outright harmful. The built-in Files by Google does the same job better and with no privacy risk.
Clearing app data instead of cache: If you tap Clear Data by mistake, you’ll lose your login and all local settings for that app. Clear Cache is the safe one. Read the label before you tap.
Doing this only when the phone is full: That’s reactive mode. The storage fills back up fast because the underlying habits haven’t changed. A 10-minute cleanup once a month keeps things manageable and means you’re never in crisis mode again.
Assuming uninstalling apps is the main fix: Apps are usually not the biggest storage problem. WhatsApp media, photos, and downloads are almost always bigger. Target those first.
One Habit That Changes Everything Going Forward
After my cleanup, I set three recurring reminders in my calendar. First of the month: clear WhatsApp media. Fifteenth: check the Downloads folder. Last day of the month: clear app cache on the heavy hitters.
Each of those takes less than 5 minutes. Combined, they prevent the situation I found myself in at my cousin’s wedding, phone frozen, moment passing, storage full.
Some phones running Android 14 and 15 also have a Smart Storage setting. Go to Settings, then Storage, and look for Smart Storage or Adaptive Storage. Turn it on. It automatically removes backed-up photos and videos after a set number of days, keeping your local storage from quietly filling up again.
My Galaxy A55 went from 1.8 GB free to 19 GB free over one weekend. No new hardware, no subscriptions, no desperate factory reset. Just a few hours of focused cleanup and some habit changes I should have made a long time ago.
Now it’s your turn. Go through these steps and come back and tell me — how much space did you free up? Drop your number in the comments. I’m genuinely curious whether anyone beats my 19 GB.